Tuesday, March 9, 2010

Pro-160 Led Video Light Review


Well, just got the Pro160 yesterday and did some testing with it.
Here are some of my impressions. (Keep in mind I also own the Comer1800).

The main purpose of trying out this light was for DSLR use, if needed. While I love my Comer1800 LED light, it's just too large and heavy to be used on a DSLR.

I tested this on my Canon 550D DSLR, as I was looking to get a lighter weight light than my Comer1800, which I generally use for off camera and on (video) camera lighting.

Build quality:
Ok, nothing to write home about. The body is completely plastic and the mount is sturdy, but would prefer metal. I might try to modify it to a stronger base. Filters are easy to apply and nice and robust. More on then later.

It's much bigger than I expected, but it's nice and lightweight, and thinner in dimension than the Comer1800. Even with the largest Sony LP battery it' s still much lighter and better balanced than my Comer 1800 is.

Light output:
Wow I was surprised!
It's bright, and the dimmer works clean and nice.
For good spread you definitely need the diffuser filter on. Without it the light is too spotty. With the diffuser applied I was happy.
I am not a fan of the 3200k filter, it's not balanced well for the LED color temperature, and the light source turns greenish in tint.
I would love to be able to get an extra diffusion filter that I could apply my own CTO gel to.

In a completely dark kitchen, throw from about 10 feet away was actually very good.

The light spread isn't as even as the Comer1800, it's a little hot in the middle and light falloff at the edges are more so than the Comer1800. But it's more than acceptable.

The dimmer works smooth and accurate.
There are no barn doors to control your light source, so light will spill everywhere. Not a huge deal breaker as I want a wide light spread for wide screen shooting anyway.

Power:
This a major strong point of the unit. Using a universal battery compartment, it takes AA batteries (6) and virtually any camcorder battery source. Not a fan of having to remove the battery door cover each time for battery replacement, but I understand why it's there.


I had to fiddle a little with getting my Sony batteries in there, but once I found the best angle to insert them it was a non-issue.
BTW, speaking of Sony batteries, the best overall size of Sony battery to use would be the NP770, as it doesn't add much weight and is easy to swap out batteries.
While the smallest NP550 battery is lightweight, due to it's thin form factor, it is annoyingly difficult to insert it quickly into the battery compartment.
The largest NP970 battery will run for a long time and is easy to get in an out. But you are adding extra weight to the light, as the NP970 battery is very hefty.
So the best Sony battery for this light, as well as the Comer1800 BTW is the NP770.

Conclusion:
Overall while not the best light out there, for the price the Pro160 is a good low cost, lightweight solution for DSLR shooting. And the PRO160 is certainly a MUCH better value than the LitePanels LPMicro, which I have tested and used.
For the small lightweight form factor, it has a strong light output, dimmable, comes with filters, is self powered (no cables), and can run for prolonged periods of time.

While I prefer my Comer1800 as a more professional light, that can be taken off camera (on light stand) and also on camera (still my light of choice for video camera), the Pro160 is a nice low cost option that I can use as a hair light or for my DSLR purposes.

And for the money I can say that the Pro160 is a steal.

Tuesday, June 16, 2009

Comer 1800 LED Light vs. Sony HVL-LBP LED Light


I have been a long time user of the Sony HVL-LBP led light. I have been very satisfied with it but had a few minor complaints about it. The biggest thing being that it only takes Sony batteries.

Well recently I ran across and purchased what I thought was a knockoff of the Sony HVL light for a cheaper price, the Comer 1800.

Well after comparing the two lights, I have come to the conclusion that I think that Comer manufactures the HVL lights for Sony and decided to release their own version of the light under their name.

As an owner and long time user of the Sony HVL-LBP lights, let me just say that the light output form the Comer 1800 puts the Sony HVL light to shame.
It's no contest.

These lights are identical to Sony in almost every and at $399, it's $200 less than the current Sony HVL lights.

But there are many other reasons that this is a much better deal for this light than just a cheaper price.

First off the Comer 1800 takes Sony and after market Sony batteries. This is huge, as there are great batteries, like that from LENMAR, that are much more powerful and cheaper in price than the Sony's.

The Sony HVL light comes in at 1200 lux, while the Comer light comes in at 1800 lux. So when comparing the two side by side, there was no compassion. The Comer kicked the Sony HVL's butt in intensity.
Sony HVL lights LED's are set to 5500k (daylight), while the Comer 1800 is set to 4500K. I really like the 4500K source as it transfers very well to being used indoors without the need of a 3200k gel. At 400k the Comer 1800 produces a very pleasing image indoors or outdoors.

But wait there's more to this.

The Comer comes with the same diffusion and spot focus filters that the Sony HVL light has. Except, that the Comer 1800 is already gelled for 3200k on the diffusion filter. This makes getting Tungesten lighting a snap if needed with just flipping down the diffusion filter. Now while some would say that this cuts down on light you are right. But because the light is so much more powerful it still produces much more light than the Sony HVL.

If you flip down both the 3200k diffusion filter and the spot focus filter, you get a very strong 3200k flood light. It's so strong that the intensity is identical to the light without any filers applied. Plus you also get a real nice strong spread too boot.

Overall , the build quality is identical to the Sony light except for a few things such as power switch and such. But it's very solid and I can't wait to give it a whirl at next weekends wedding shoot.

It seems like I will be selling off my Sony HVL lights for some more Comers. As a matter of fact I just ordered 2 more from LA.Color Shop before this post. BTW, the L.A. Color Shop owner Taky is a real stand up guy. He's helped me out with a few problems that I had with my old Sony HVL light. How's that for customer service.

Friday, January 2, 2009

REVIEW of VIZIO VA22LF (22" 1080P) TV


In the last year I have migrated to shooting and editing HDV video using Sony FX1's, Canon HV20, and Sony Vegas 8, as well as Apple FCP.
Since I have a very small workspace I needed a small solution in which to work with.

One of my biggest goals was to find a solution that would avoid any rescaling or artifacting.

I wanted something that had a TRUE 1920x 1080 native resolution. And the smallest possible solution, until recently was the 32" Samsung, which was still too large to setup in my workspace.

That is until this past week, when I noticed that VIZIO had developed, which currently, might be the smallest true 1080P LCD tv, in the form of the
VIZIO VA22LF.

I was so excited when I read the specs on it. That I ran out right away to Target, and picked up the 22" VA22LF to give it a whirl.


BTW, here are just some of the specs (I'm not going to post all of the intensive details here, as they can be seen on the link above):

Native Panel Resolution: 1920 x 1080
Supported PC Resolutions: 1920 x 1080, 1366 x 768, 1024 x 768, 800 x 600

Specification:
Display Compatibility: FHDTV (1080p)
Signal Compatibility: 480i (SDTV), 480P (EDTV), 720P (HDTV), 1080i (HDTV), 1080p(FHDTV)
Response Time: 5 ms
Colors: 16.7 Million

Inputs:
RF (F Connector for internal tuner): 1
HDMI with HDCP: 2
Analog Stereo Audio for HDMI Inputs: 1
Component YPbPr plus Stereo Audio: 1
Composite Video: 1
S-Video plus Stereo Audio: 1
Computer RGB plus Stereo Audio: 1
Service Port: 1

Outputs:
Analog Audio out (RCA): 0
5.1 SPDIF Digital Optical Audio: 1
Headphone (Stereo Mini-Jack): 1


"Enough about the specs on this baby, how did it perform?"

Before we get to how it performed, let me just share my current editing workflow.

My current setup, I edit on a Quad Core MAC PRO with a Intensity Pro HDMI/PCI card installed, and use a 24" DELL display for my main monitor. I also have a JVC SD monitor that I use for color correcting my footage via the Black Magic Intensity Pro PCI card.


My JVC monitor can be used for HD footage, via the Intensity card, which will down convert HD footage to SD, and send it via component cables. But as I said, I have been looking for a small HD monitor/TV that I could setup and use to obtain fairly accurate HD color correction with.

"Ok, now can we get to the performance of the Vizio?"

The picture quality is very good, especially for the $300 price tag.

Manual picture controls are adaquate, as you have control over Brightness (black value), Contrast (white value), Tint, Color saturation, and even indpendant color temperature (RGB) if desired. You can turn off DCR (Dynamic Contrast Ratio) which is great, as the reason why I never purchased the Sharp sets is that you can't easily turn off DNC without having to go into the service menu to do it (no thanks). There are also other features which are nice to turn on and off, depending on what you are doing. As some of these controls are great for normal viewing, but not desired for critical work.

The LCD screen is glossy so you get a nice looking blacks without being overly crushed (after calibration). Speaking of calibration, I wish that Vizo had a Blue Gun setting in the menu like the Samsung has. This would make color calibration a snap, without the need for blue gel.

As for color work out of Vegas 8 or FCP6 via HMDI, it worked flawlessly. The picture did seem to be sharper in Vegas though rather than FCP. This is most likely due to the fact that Vegas lets you preview "Best" true display quality from the timeline, where FCP (even at best settings) still seems a bit soft. Color reproduction seemed consistent between the two programs, and seemed pretty accurate overall. Although, the blacks seemed a bit grainier than they looked on my computer screen. I'm still checking to see if the footage was truly grainy of this is LCD artifacting. I think that I had some scaling going on from FCP.

As for straight camera or HD set top box to the LCD, it looked great. I hooked my Comcast HD box as well as AF connection (viewed open air HD of local stations), and the pictures seemed identical and crisp, with no artifacting.

As for running my HV20 (in good lighting of course) into the LCD, the picture looked nothing short of GREAT. Unfortunately, my FX1's only give you Composite connections from the camera, which did look very good as well, but not as good as HDMI did.

I might have a Gefen Composite to HDMI box floating around that I can try out.

Onboard audio is alright, nothing special from the small built in speakers. Boosting the Bass did help some, but I'm not relying on the built in speakers for more than monitoring or quick preview of picture to audio sync. Speaking of sync, the Vizio has a neat setting called lip sync, which can help you adjust the drift between picture and audio that you sometimes get from cable viewing.

All in all while not the best LCD on the market, I think that this little LCD is more than adequate for most of my (as an event shooter) needs.

This would be a GREAT set to take with you to bridal shows, or even on a live shoot though to use as a reference monitor, as it only weighs 11 lbs., and only 2.5" thick.

This set is currently hard to find, as only Target currently is selling them online.
The funny thing about this is that online it said delivery in 2-6 weeks. I checked local store inventory on the Target website and it only gave me one local store with it in stock. When I went to the store, they had no Vizio sets on the floor, and the salesman said that he had never seen a Vizio set in the store. When he checked the inventory in his computer, it showed that he had them in stock. Guess they JUST CAME IN. Well of course I got one, and guess what, so did the salesman.

Can I get commission on that.

Just a quick note...
When he brought it out and rung it up it came out to be less than advertised online $311 or something like that, it's online for $329.

Gotta like that as well.

Wednesday, April 23, 2008

NEW! Juicedlink CX211 XLR Adapter...

Well as some of you may or may not know, I shoot event video and use a pair of Sony FX1 cameras.
Well the manual video control on these cameras are fantastic. But the audio has a lot to be desired. As the FX1's audio can't be independently controlled for L/R audio and only accepts 1/8 mic inputs.

Well this is where accessories like XLR adapters (small box that accepts XLR inputs and has a 1/8 balanced cable that plugs into your 1/8 mic input) come into play. I currently use a Beachtek DXA-FX, which was specifically for the Sony FX1. While the box works very well, it still could be better, as the pre amps in the unit are a bit noisy and as such brings the noise floor up to create a little white noise in your audio.

Well, I was contacted by the developer of Juicedlink to test out one of his CX211 Audio Adapter against my Beachtek DXA-FX XLR adapter, and I must say I was pleasantly surprised. Here is a brief rundown of the unit itself. I have only been able to run some quick basic tests so far and I hope to post audio examples and pictures of the two at a later date.

The switches on the box are a little on the small side, but manageable for my fat fingers.

The pan switches are on the front side of the box and mic setup can be set to L/C/R for each channel on the rear of the unit.


There's no mono stereo setting because of the selectability of each channel. So if you are using just one mic then set that channel to center and you're set. I actually like this setup better than a simple mono/stereo switch, because you can even do a center mic with one channel to both L/R tracks as well as set the other channel for a L or R pan. So one mic goes to two tracks and the other input can go to just one.

Now for the fun part.

As I said I did a quick down and dirty test with the CX211 and a Rode NTG2 mic and my Samson Micro 32 wireless.

First off this unit when set to Medium or Low pre amps, is real quiet. And i do mean quiet.
You do have to be careful though if you are using just one mic and set your pre amp to Low, that you turn down the free channel all of the way. The reason is that the noise floor on the Low pre amp channel being used is so low, that the other channel is above the noise floor, thus creating a lot of white noise. As soon as you turn down the other unused channel all of the way, it's perfect.

The audio pots on it are small but smooth to turn and gives very even and fluid sound level adjustment.

The unit doesn't have a built in limiter on it, but it does have a 20dB output pad integrated into the box. The mixer has the flexibility to go from `+16dB gain, to full attenuation (no input signal). Whatever signal you input into the Juicedlink, you will be able to adjust it with the appropriate amount of gain/attenuation to get it in the sweet spot of the camcorder mic input.

All in all for a first quick test, I am impressed.
Right off of the bat with just headphones, the CX211, even with the CX211's pres turned up to high, was much quieter than my DXA-FX1 from Beachtek.
In the coming weeks I am going to actually record both to tape for a head to head and post for all.

Right now I would say that this box will give you better audio than if you had a Sony Z1 and used the built in XLR's. The difference is dramatic because of the pre amps (as Sony's are notoriously noisy).

BTW, the developer (Robert) has also posted a new video testing the CX231 (same as CX211 but has 48v phantom power) against two Beachtek boxes and a Mix Pre. Here's the video comparison from his website.


Also, besides the base CX211, which I tested, they also have:
CX231 (which is the same as the CX211 but with phantom power)
CX411 (which is the same as the CX211 but with 4 channels of audio)
CX431 (which is the same as the CX411 but with phantom power)
CX431 (which is the same as the CX411 but with phantom power, Per-channel low cut filters, and Audio level display)

I would highly recommend a Juicedlink box to anyone who doesn't have XLR capability on camera and would like to bring their audio quality up to a higher level.

Feel free to go to Juicedlink's website for more details and comparisons.

Friday, March 7, 2008

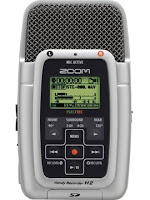
Review of the Zoom H2 Recorder

Well folks, this is going to be the official debut thread for the New Zoom H2 recorder that many have heard about.

The functions are very similar in to the H4. So anyone who has used an H4 will know most capabilities.

I am going to break down the unit into Pro/Cons.

Pros:
1. Small form factor (even smaller then the Edirol R09). This will make it very easy to place on a groom or person without getting in the way or looking too clunky. It's best placed in the breast pocket on on his waist, just as you would place a wireless transmitter on his person.

2. Very nice build. The finish is very nice satin steel finish (yes it's plastic), and very solidly built. It actually feels much more substantial and well built then the H4.


3. Manual controls:
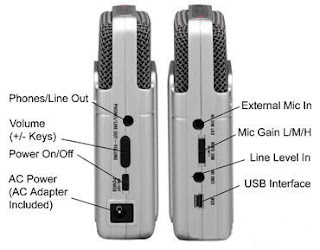
a. Nice recessed buttons that make it very easy to navigate, as well as avoid buttons from accidentially getting hit during recording.

b. Recording levels can adjusted on the outside of the unit. No digging into the menu like the H4. Yippee.

c. 4 different mic configurations.
90 degrees: record from front of mic element
2 Channel stereo: mic records from front and back of mic (you can place this right on a mic stand in the middle of a band and record either the entire band at once, or face one side of the mic towards the crowd and the other towards the band to record both sources.)
4 Channel Surround: Record in the same manner as 2Ch,
EDIT: Creates two separate WAV files (labels them SR***L and SR***R)...thus allow you to set the 3D panning of the four mic elements. This can either be done in computer sound program, or the unit itself (you can set your levels after recording, to create your 4 channel mix).
120 degree: record using the back of the unit to record in a 120 degree radius.

d. L/M/H Gain settings on outside of unit for quick adjustments when needed

5. Normalization: you can normalize your recording right in the unit with no need to do it on the computer

6. Menu adjustable AGC/Compressor/Limiter

7. Digital audio pass through. Record to the unit and send the identical signal to your camera (via wireless) by way of the Phones/Line Out 1/8 port

8. 1/8 Mic and Line in ports. Don't have actual tests with this yet, but they are there for easy access. Actually this unit is really meant to be used as a mic recorder and external mics shouldn't be needed. BTW Mark mentioned to me today " One item I'm concerned with is the ext. mic circuit...will it allow GS lavs (etc) to plug in and record without the audio falling into the noise floor..." I wouldn't worry about that too much as you should be able to use the units external gain settings to prevent that. I believe that you would have to supply mic power to the lavs though (which is in the menu).

9. SD card recording: From early reports you can record to SD cards up to 4GB without a problem. And some selected 8-12 GB cards. The only drawback here is that you have to format the cards outside of the unit.

10. High fidelity recordings. You can record in as high as 24/96 WAV format. No worry about sync issues for the most part here. We'll have to see when reports roll in from the field.

11. Built in mics. The mics actually sound a bit cleaner than the H4 mics do. Again, we have to wait till I or others get it in the field.

12. Time stamp and track marker function in WAV record mode.

13. NEW, as reported by Mark: Good news on the lav issue...not only do regular lav mics work (you have to enable mic power through the menu) but GS mic wired for the iRiver works also. When you're using an ext. lav mic with a typical wired configuration, it will record to left channel only. If you use a Giant Squid that was configured to work with your iRiver, it will record to right channel.... "

14. NEW, as reported by Mark: Good and bad news for the hold function... Bad news...the on/off switch is still active so if someone shuts it off...well..... Good news...the recording goes through shut down process so you won't loose file.

15. NEW, as reported by Mark: Unit will use either alkaline or oxyride batteries...I would recommend oxyride for long record times at receptions

* Explanation of oxyride battery: Oxyride batteries use updated alkaline chemistry that includes a finer grained graphite and manganese dioxide, allowing a denser fill of material. With an advanced substance for the cathode or negative (-) side, called oxy nickel hydroxide the batteries maintain higher voltage. Oxyride batteries also utilize a vacuum-pouring technology in the production process, allowing more electrolyte to be packed into each battery for increased durability. Hence, increased power and a longer life....

16. NEW, as reported by Mark: Full-time Monitoring: To enable full time monitoring of the input signal, press the menu key. Scroll through unitl you see "monitor" and select "on"

17. NEW, as reported by Mark: Another "cool" feature: by pressing the play/pause button while recording, you can set a BWF (Broadcast Wave Format) compatible cue point. Not sure all NLEs can read this info...but it places a marker on the audio timeline. This would be beneficial in a long recording to identify important areas when scrubbing a timeline

18. Ease of transferring files to the computer over the iRiver...no more importing files to the iRiver music manager to convert. Simply select "USB" on the menu and the computer sees the H2 as a removable drive

19. Latest Update on SDHC cards: Just purchased SanDisk (comes with SDHC reader for your computer) and PNY SDHC 4GB cards from Circuit City. The H2 recognized them and formated them with no problem. They also function perfectly. Still waiting to see what the best deal might be on obtaining 8GB SDHC card.

20. You are able to format and use 8GB SDHC cards. I purchased this 8GB Transcend SDHC card, and was able to format the card in the H2 itself and use it.

21. To prep the H2 to place on groom or officiant after you switch it on, place a small piece of electrical tape over the on/off switch. This will not only keep it from accidentally being switched off, but will hide the switch itself so THEY don't switch it off before you want it to.

22. NEW, in response to Cons #7 on the preamps and loud venue recording. this would be the best recorder setup to record loud events, like micing a PA stack.
H2 loud environment recording
Mic Gain low,90° from the front,
Limiter - concert,
Wave 16bit/48 kHz (at least 16/48 so you can have the same bitrate as your recorded DV tape)


Cons:
1. Form factor for mounting on a mic stand. The H2 has a 1/4 thread at it's base, which means that the unit is really meant to be mounted straight up. They do supply a small pole of some kind that could be mounted into a mic holder if needed. But I would hate it.

2. SD card loads from the bottom. The same bottom that the unit mounts. Means that you have to remove the unit to change cards. However, if you use long running 2-4 8-12 GB cards, then there would be no need to remove these cards when recoding in the field.

3. No XLR inputs. Well we knew this. And not really a bit con, since I wouldn't be using an external mic with this unit. Except for maybe a lav.

4. Levels can't be adjusted while unit is in Hold mode (hold the Menu key to put the unit in "Key Hold" mode). You can power the unit down or adjust the L/M/H gain switch on the unit if needed.

5. Never insert or remove the SD card while power to the H2 is on. Otherwise data can be destroyed.

6. When you change SD cards, the H2 does not retain your current setings. EDIT: Your settings seem to be cached in the SD card themselves and not the H2 memory. So if you inserted a brand new SD card you would get the default 44/16 WAV settings.

7. Pre Amps are not that great. Used the H2 at a wedding this weekend in placed in front of Bose speakers the DJ was using, with H2 set on M (Medium) pre amp. At a point he cranked the sound up. Audio turned to squelching mush, until I set Pre amp to L (Low), then all was good. If you place H2 in front of PA stack, make sure that you turn Pre amp to L (Low).

8. I just found out from testing the H2 won't do a 2gb seamless split...it loses about a second or two....

These are just some quick observations.
And more and sound tests and info will be added to this thread when they become available.

I will say, that for those looking for a replacement for their IRivers. That's a small form factor, inexpensive (only $199 and that was the actual retail price for the 1GB IRiver. And this can record on SD cards for up to at least 4GB.), record in MP3 (why bother), when you can record in WAV 16/48, 24/48 or 24/96, built in stereo mics, that can record in 4 channel surround, and much more.

From what I have seen first hand, It's here in the form of the H2. While it won't be the best audio unit out there. It will be the best low cost unit out there.

H2 Recording setup UPDATE:
Due to the fact that the H2's audio input level is set before the pre amps, some additional noise floor noise can be heard. To solve this problem, ALWAYS set your record level at least at 100. then set you onboard L/M/H pre amp accordingly for usage. So an optimal setup for micing a loud PA stack would be Pre Amp: L (low) Recording Level: 100-110 Limiter/Compressor: OFF Mic
Config: 2CH or 4CH for optimal ambient recording. This setup should yield most acceptable recoding with little problems.

Recording Setup: Wave 16bit/48 kHz or 24/96 (at least 16/48 so you can have the same bitrate as your recorded DV tape)

Old Edirol R09 Audio Review

Old Post from 2006:
(Coming soon Audio posts on Zoom H2, Marantz PMD620, Edirol R-44)


Here are some audio samples from the new Edirol R-09 recorder. Audio was recorded off of one of my M-Audio DX-4 monitor speakers by a AT822 stereo mic fed into the R-09's 1/8 mic jack. As well as a speaker test, I also used the R09 at an outdoor wedding ceremony, micing a woodwind ensemble.

There are 2 ways I tested:
1. R-09's built in stereo mic input
2. AT822 straight into R-09's 1/8 mic input
3. AT822 mic fed into PSC Promix 3 mixer, fed into R-09's 1/8 line input
4. Outside woodwind test, using AT822 mic fed into R-09's 1/8 line input

*NOTE:
This was a straight test with no post sound correction.
There is some computer fan noise heard in the built in mic and AT822 tests.
Due to the fact that a mixer supplies you with built in low cut filters and limiters, little fan noise from my ProMix 3 test is heard.

*My latest test uses just the R-09 and AT822 mic, in an outside wedding ceremony, recording 2 woodwind musicians. The 822 was setup off to the side of one musician and faced inwards to all 3.

All audio has been reduced from original 44 Hz 16 Bit Wav to 320 Kpbs 44,100 Hz, Stereo, mp3 file for the web.

Click the appropriate link below to play mp3 audio

R09 Built in Mic

At822 to R-09

AT822 to Promix

AT822 Woodwind

Mobile Audio Rig


Here is an example of one of my bare bones, stripped down, mobile recording setups for quick setup and portability. You will notice that there are no cables in this setup. So it's entirely mobile and efficient for quick fast moving recording situations.

Recorder: Samson Zoom H4 (also use Edirol R09, Marantz PMD620, and Zoom H2)
Microphone: AT822 stereo mic plugged into the recorder and Samson wireless handheld with built in Micro32 transmitter.
Mic Stand and Bracket: (stand) Atlas TEB-E (bracket for recorder) Windtech add on clamp (MSA1)
Mic Stand Adaptor: (for Recorder) Edirol OP-R09M Mic Stand Adpator for R09